Dome
Dome Mouser
DMMZ1
Notification Sensor
HW: 82 FW: 3.16
ZM5202
6.51.06
0x021F (543)
0x0003 (3)
0x0086 (134)
ZC10-16095211
2016-09-06 11:29:40.7486
N/A
Routing Slave
Reporting Sleeping Slave
Yes
Dome Mouser Smart Electronic Mouse Trap- Clean, Safe & Humane Solution To Rodent Problems
The Dome™ Home Automation DMMZ1 Mouser is a powerful rodent electric trap with Z-Wave technology built-in. It kills mice, rats and other rodents quickly, cleanly and humanely with a powerful jolt of electricity. Simply set bait, turn on and place in desired location. When connected to Z-Wave Certified Hub, once the trap is full, it sends out a notification to your smarthome system. You can easily dispose of Mouser’s contents without ever having to touch them. Use the top handle and tip to dispose of caught rodents. Specially designed removable and washable bait tray will allow you to easily replace the bait and set it back up. It operates on 4 AA batteries (not included) and is optimised to last over 50 uses. Mouser features extra-long Z-Wave wireless range (up to 150 ft) and Dome™ DMMZ1 Mouser comes with a 1-year limited warranty. Measurements in inches: 8.75 x 4.5 x 5. Dome™ Home Automation Z-Wave devices give your family peace of mind and security you can count on. With Dome™, you’re always connected and always covered. • Humanely kills mice, rats and other rodents with a powerful electric shock and sends an alert to your smarthome system when the trap needs to be emptied • Easy to use: set bait, turn on and place in desired location Touch free: hold handle and tip to dispose of contents, then set it again • Up to 150-foot Z-Wave range. Operating Temperature: 32°F - 112°F. Powered by 4 AA batteries (not included) enabling it to be triggered over 50 times • Z-Wave Plus Certified. Works as a stand alone electronic mouse trap but requires a Z-Wave Certified Hub for notification functionality • Tested to work with SmartThings, Vera, Staples Connect, HomeSeer, Nexia, Piper, URC, Harmony. Not supported by Wink, DSC, ADT Pulse, 2Gig, Napco, Interlogix, Honeywell (Dome is not associated with listed brands)
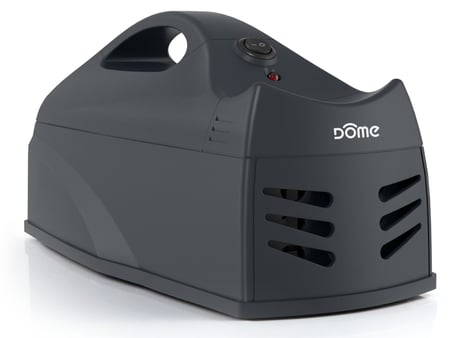
Product Picture


1 - BASIC_SET Level
This parameter sets the value sent by the BASIC_SET command to Association Group 2 (for more information, see “Assocation Groups”.)Size: 1 byte
Default: 255
Minimum: 0
Maximum: 0
Possible values
| From | To | Desription |
|---|---|---|
| 0 | 0 | Turn Off Device |
| 1 | 99 | Dim Level |
| 255 | 255 | Turn On Device |
2 - Set Firing Mode
This parameter sets “firing mode” of the Mouser. Two firing modes are available: in the first (Continuous Fire,) electricity is passed continuously for four minutes, and in the second (Burst Fire,) electricity is passed continuously only for the first minute and it is pulsed at approximately 400 beats per minute for the remainder of the time.Size: 1 byte
Default: 2
Minimum: 0
Maximum: 0
Possible values
| From | To | Desription |
|---|---|---|
| 1 | 1 | Continuous Fire |
| 2 | 2 | Burst Fire |
3 - This parameter defines how long the Mouser will fire continuously before it starts to burst-fire (see parameter 2.)
This parameter defines how long the Mouser will fire continuously before it starts to burst-fire (see parameter 2.)Size: 2 bytes
Default: 100
Minimum: 0
Maximum: 0
Possible values
| From | To | Desription |
|---|---|---|
| 100 | 360 | in Seconds |
4 - Enable/Disable LED Alarm
This parameter enables or disables the indicator LED alarm when the trap is tripped.Size: 1 byte
Default: 1
Minimum: 0
Maximum: 0
Possible values
| From | To | Desription |
|---|---|---|
| 0 | 0 | LED Alarm Disabled |
| 1 | 1 | LED Alarm Enabled |
5 - LED Alarm Duration
This parameter sets the amount of time the LED Indicator blinks after the trap is tripped.Size: 1 byte
Default: 0
Minimum: 0
Maximum: 0
Possible values
| From | To | Desription |
|---|---|---|
| 0 | 0 | LED Blinks Until Trap is Reset |
| 1 | 255 | in Hours |
Follow the instructions for your Z-Wave Certified controller to enter inclusion mode. When prompted by the controller: 1. Bring the Mouser to within 10’ of your Z-Wave controller for the inclusion process. After successful pairing, the device can be brought to the desired location. 2. Remove top cover by sliding it back and lifting up. 3. Insert batteries. 4. Press the CONNECT BUTTON quickly 3 times in a row. 5. The LED INDICATOR will flash five times indicating inclusion
Follow the instructions for your Z-Wave Certified controller to enter exclusion mode. When prompted by the controller: 1. Remove top cover by sliding it back and lifting up. 2. Press the CONNECT BUTTON quickly 3 times in a row. The LED INDICATOR will flash five times indicating exclusion/disconnection.
If needed, the Mouser can be reset locally by following these steps. Only do this when your Z-Wave controller is disconnected or otherwise unreachable. Beware that resetting your device will disconnect it from the system: 1. Remove the TOP COVER and confirm that your Mouser is powered up. 2. Press and hold the CONNECT BUTTON for at least 10 seconds then release. A flashing LED INDICATOR indicates a successful factory reset. 3. The Mouser’s memory will be erased to factory settings.
If needed, the Mouser can be reset locally by following these steps. Only do this when your Z-Wave controller is disconnected or otherwise unreachable. Beware that resetting your device will disconnect it from the system: 1. Remove the TOP COVER and confirm that your Mouser is powered up. 2. Press and hold the CONNECT BUTTON for at least 10 seconds then release. A flashing LED INDICATOR indicates a successful factory reset. 3. The Mouser’s memory will be erased to factory settings.
| Type | Value(s) |
|---|