Dome
Dome On/Off Plug-In Switch
DMOF1
On/Off Power Switch
HW: 65 FW: 3.70
ZM5202
6.51.06
0x021F (543)
0x0003 (3)
0x1087 (4231)
ZC10-16095213
2016-09-06 11:19:05.2358
N/A
Enhanced 232 Slave
Always On Slave
Dome™ Z-Wave On/Off Plug-In Switch with Energy Monitoring, Miniature, Z-Wave Extender
The Dome™ Home Automation DMOF1 On/Off Plug is designed to give you control over small appliances from your smart device wherever you are. Conserve energy and save money always knowing how much power is used by every monitored appliance. Plug in your lamp and have it turn on/off on demand or according to preset schedule (Z-Wave Certified Hub required). Also great for humidifiers, dehumidifiers, air conditioners, space heaters, fans and holiday lights. It never blocks the other side of your duplex receptacle with the ergonomic design. Extra-long Z-Wave wireless range (up to 150 ft) allows you to place it where it’s needed without worrying if the signal is reaching your Z-Wave Hub. It also acts as a Z-Wave range extender. Dome™ DMOF1 On/Off Plug comes with a 1-year limited warranty. Measurements in inches: 1.625 x 1.625 x 2. Dome™ Home Automation system gives your family peace of mind and security you can count on. With Dome™, you’re always connected and always covered. • Used to turn On/Off lamps and small appliances for up to 13 Amps (1,560 Watts). Monitors energy consumption of attached device and shuts down in case of overload with build-in protection circuit • Ergonomic design allows it to only occupy single side of electrical duplex leaving the second outlet fully accessible. It doubles as Z-Wave signal extender • Up to 150-foot range. Operating Temperature: 32°F - 112°F • Z-Wave Plus Certified. Requires a Z-Wave Certified Hub to operate • Tested to work with SmartThings, Vera, Staples Connect, HomeSeer, Nexia, Piper, URC, Harmony. Not supported by Wink, DSC, ADT Pulse, 2Gig, Napco, Interlogix, Honeywell (Dome is not associated with listed brands)
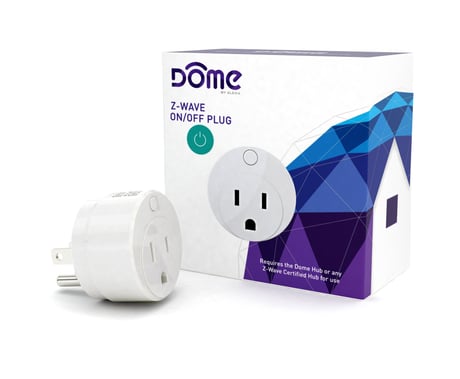
Product Picture


1 - Enable/Disable METER_REPORT
This parameter enables/disables the METER_REPORT function, which sends periodic reports to Group1 members with information on line voltage, current load, and power & energy consumption. Also see Param 2 & 6.Size: 1 byte
Default: 1
Minimum: 0
Maximum: 0
Possible values
| From | To | Desription |
|---|---|---|
| 0 | 0 | Disable Meter Functionality |
| 1 | 1 | Enable Meter Functionality |
2 - METER_REPORT Interval
This parameter sets the amount of time between each successive METER_REPORT signal sent to Group 1 (also see Param 1 & 6.)Size: 2 bytes
Default: 300
Minimum: 0
Maximum: 0
Possible values
| From | To | Desription |
|---|---|---|
| 1 | 65535 | in seconds |
3 - Set "Overload" Current Level
Sets the maximum current the plug will pass before it cuts off power and sends a NOTIFICATION_EVENT_POWER_MANAGEMENT_OVER_LOAD_DETECTED signal to Group 1 and a BASIC_SET(FF) to Group 2. The LED will then blink red once per second until the current returns to normal. To clear the NOTIFICATION and start monitoring again, the BUTTON must be pushed once (only after the current is back to normal.) NOTE: this value must be higher than Param 4Size: 1 byte
Default: 13
Minimum: 0
Maximum: 0
Possible values
| From | To | Desription |
|---|---|---|
| 1 | 16 | in Amps |
4 - Set “Alert” Current Level
Sets the current level at which the On/Off Plug-In Switch will flash its LED yellow, until the current returns to below this level. It will NOT cut off current to the device; this functions as a visible warning to the user. NOTE: this value must be lower than Param 3Size: 1 byte
Default: 12
Minimum: 0
Maximum: 0
Possible values
| From | To | Desription |
|---|---|---|
| 1 | 15 | in Amps |
5 - Enable/Disable Indicator LED
This parameter enables or disables the indicator LED.Size: 1 byte
Default: 1
Minimum: 0
Maximum: 0
Possible values
| From | To | Desription |
|---|---|---|
| 0 | 0 | Disable LED |
| 1 | 1 | Enable LED |
6 - Current change METER_REPORT level
In addition to sending a METER_REPORT to Group 1 in the time interval set by Param 2, the On/Off Plug-In Switch also sends a METER_REPORT when it detects a relative change in current flow. This parameter sets this minimum current change amount, in percent, at which point the On/Off Plug-In Switch will send a METER_REPORT to Group 1. Also see Param 1 & 2.Size: 1 byte
Default: 5
Minimum: 0
Maximum: 0
Possible values
| From | To | Desription |
|---|---|---|
| 1 | 100 | in percent change in amps |
7 - Remember On/Off Status
This parameter sets whether or not the On/Off Plug-In Switch will remember if it was turned on or off when it was last plugged in. If enabled, whenever the device is rebooted (plugged in and out of the main outlet,) it will resume its state from before the reboot. If disabled, it will turn on everytime the device is rebooted.Size: 1 byte
Default: 1
Minimum: 0
Maximum: 0
Possible values
| From | To | Desription |
|---|---|---|
| 0 | 0 | Do not Remember On/Off Status |
| 1 | 1 | Remember On/Off Status |
8 - Enable/Disable Timer Function
If this parameter is enabled, whenever the On/Off Plug-In Switch is turned on, it will automatically turn off after a set amount of time (set in Param 9.)Size: 1 byte
Default: 0
Minimum: 0
Maximum: 0
Possible values
| From | To | Desription |
|---|---|---|
| 0 | 0 | Disable Timer Functionality |
| 1 | 1 | Enable Timer Functionality |
9 - Set Timer Time Interval
Sets the time interval before the On/Off Plug-In Switch automatically shuts off. See Param 8.Size: 2 bytes
Default: 150
Minimum: 0
Maximum: 0
Possible values
| From | To | Desription |
|---|---|---|
| 1 | 65535 | in Minutes |
10 - Enable/Disable BUTTON
If this parameter is enabled, the user can turn the device on or off using the BUTTON.Size: 1 byte
Default: 150
Minimum: 0
Maximum: 0
Possible values
| From | To | Desription |
|---|---|---|
| 0 | 0 | Disable Button |
| 1 | 1 | Enable Button |
Follow the instructions for your Z-Wave certified Controller to enter inclusion mode. When prompted by the Controller: 1. For proper inclusion, bring the On/Off Plug-In Switch to within 10 feet of your Controller and plug it in. After inclusion, the device can be moved to any desired location. 2. Press the Connect Button quickly 3 times in a row. The LED Indicator will flash five times indicating inclusion.
Follow the instructions for your Z-Wave certified Controller to enter exclusion mode.When prompted by the Controller: 1. Plug in the On/Off Plug-In Switch within range of your Z-Wave Controller. 2. Press the Connect Button quickly 3 times in a row. The LED Indicator will flash five times indicating exclusion/disconnection.
To disconnect from the Z-Wave Network and restore factory default settings: 1. Plug in the On/Off Plug-In Switch. 2. Hold the Connect Button for 10 seconds until the LED Indicator blinks once, then release the button. Only do this if the controller is disconnected or otherwise unreachable!
| Type | Value(s) |
|---|
| Meter type |
|---|
| Electric Meter Consumption |