Siterwell Technology
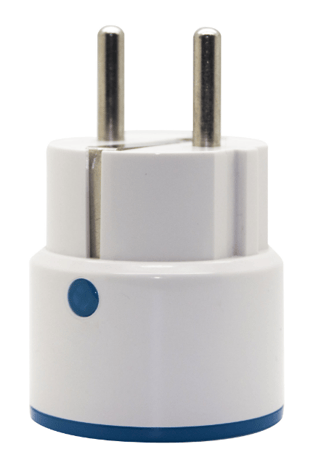
Siterwell Power plug Sensor
STW-W3350WU
On/Off Power Switch
HW: 65 FW: 3.70
ZM5202
6.51.06
0x0266 (614)
0x0003 (3)
0x0350 (848)
ZC10-17085749
2017-08-25 21:31:31.853114
N/A
Enhanced 232 Slave
Always On Slave
Smart power plug can control the on/off of electric appliance on mobile app. detect the current, voltage, accumulated voltage and offer overload protection.
This product can be included and operated in any Z‐Wave network with other Z‐Wave certified devices from other manufacturers and/or other applications. All non‐battery operated nodes within the network will act as repeaters regardless of vendor to increase reliability of the network. In the front casing, there is button that is used to carry out include, exclude or reset factory default settings on PCB Board. When power is first supplied, the LED will flash on and off with yellow alternately every 1 second intervals within 5 seconds if the detector has not been added a Z‐Wave network, otherwise the LED will flash on and off 5 times with cyan alternately every 300 millisecond. Please get familiar with the terms below before starting the operations. This Plug has function that remembers the relay states, the plug will turn on after power up next time if the plug is turn on before the power cut‐off.


1 - Meter Report Enable
This parameter defines Disable/Enable meter report measure data to controller.Size: 1 byte
Default: 1
Minimum: 0
Maximum: 0
Possible values
| From | To | Desription |
|---|---|---|
| 0 | 0 | Disable Report |
| 1 | 1 | Enable Report |
2 - Set Report Interval
This parameter defines interval time (in seconds) that Meter report data to main controller.Size: 2 bytes
Default: 300
Minimum: 0
Maximum: 0
Possible values
| From | To | Desription |
|---|---|---|
| 1 | 65535 | s |
| 0 | 0 |
3 - Set the upper current threshold.
This parameter defines maximum current the plug can provide to load that be connected to plug. If the current consumed by load is greater than maximum current, the plug will cut off power, and send NOTIFICATION_EVENT_POWER_MANAGEMENT_OVER_LOAD_DETECTED to associated devices in lifeline. Red Led will blink every seconds until current is normal (less than Parameter #3). You must remove the loader and turn on the Plug (press the button once) to enable current monitor and clear NOTIFICATION ALARM. This parameter value must be great than #4. If user set this parameter to default by Configure CC, the parameter #4 will be set to default value.Size: 1 byte
Default: 13
Minimum: 0
Maximum: 0
Possible values
| From | To | Desription |
|---|---|---|
| 1 | 16 | Ampere |
| 0 | 0 |
4 - Set Alarm upper current threshold
This parameter defines maximum current, if the current plug provide to load is great than this parameter, the plug will light yellow LED, but plug cannot cut‐off power. This parameter value must be less than parameter #3. If user set this parameter to default by Configure CC, the parameter #3 will be set to default value.Size: 1 byte
Default: 12
Minimum: 0
Maximum: 0
Possible values
| From | To | Desription |
|---|---|---|
| 1 | 3 | Ampere |
| 0 | 0 |
5 - LED Enable/Disable
This parameter defines the LED indication Function ON/OFF. This parameter can be configured with 0 or 1, where 0 means disable LED indication Function and will always be turn‐off, and 1 means enable LED Function.Size: 1 byte
Default: 1
Minimum: 0
Maximum: 0
Possible values
| From | To | Desription |
|---|---|---|
| 0 | 0 | |
| 1 | 1 |
6 - Meter Reporting Setting
This parameter defines by how much current changed must change to be reported to the Z‐Wave Controller or Z‐Wave Gateway, in percents. If the rate of current change ratio is greater than this parameter, the plug will report the results, voltage, current, power and energy, that plug measure to Z‐Wave Controller or Z‐Wave Gateway.Size: 1 byte
Default: 5
Minimum: 0
Maximum: 0
Possible values
| From | To | Desription |
|---|---|---|
| 1 | 100 | % |
| 0 | 0 |
7 - Remember Relay Status
This parameter defined the relay status if remember or not. If remembered, the plug will restore the relay status last power off when the plug supply power next time.Size: 1 byte
Default: 1
Minimum: 0
Maximum: 0
Possible values
| From | To | Desription |
|---|---|---|
| 0 | 0 | Don’t Remember, the relay will keep OFF when Plug Supply Power |
| 1 | 1 | emember the Relay Status. |
8 - Time switch Configure
This parameter defines the timer function Enable/Disable. This parameter can be configured with 0 or 1, where 0 means disable time switch function and 1 enable. The time period will be defined in parameter #9. If this parameter is Set to 1, and when turn the plug relay on, the timer in plug start run with time period defined in parameter #9 and the plug will turn the relay off.Size: 1 byte
Default: 0
Minimum: 0
Maximum: 0
Possible values
| From | To | Desription |
|---|---|---|
| 0 | 0 | Time switch Disable |
| 1 | 1 | Time switch Enable |
9 - Time switch Configure
This parameter defines the time period that plug time switch off. This parameter can be configured 1 ~ 65535(in minutes). If Parameter #9 is set to ‘1’, and relay is turn‐on, the relay will be turn‐off after delay this parameter.Size: 2 bytes
Default: 150
Minimum: 0
Maximum: 0
Possible values
| From | To | Desription |
|---|---|---|
| 1 | 65535 | minutes |
| 0 | 0 |
10 - Enable Button On/Off
This parameter defines the button on/off function is enabled or not on the top of the wall plug. This parameter can be configured 0 and 1. If this parameter is set to ‘1’, users can turn on and off the wall plug by pressing the button on the top of the wall plug. If this parameter is set to ‘0’, the wall plug cannot be turned on and off by pressing the button.Size: 1 byte
Default: 1
Minimum: 0
Maximum: 0
Possible values
| From | To | Desription |
|---|---|---|
| 0 | 0 | |
| 1 | 1 |
Add the Device (Smart Plug) to Z‐Wave Network 1.Make sure the sensor is powered. 2.Set Z‐Wave controller or Z‐Wave gateway into inclusion mode (Refer to the controller or gateway operating manual) 3.Press the button three times within 1.5 second, the device will enter inclusion mode. And the LED will flash on and off with green alternately five times within 2 seconds.
Delete the Device (Smart Plug) from Z‐Wave Network 1.Make sure the sensor is powered. 2.Set Z‐Wave controller or Z‐Wave gateway into exclusion mode (Refer to the controller or gateway operating manual) 3.Press the button three times within 1.5 second, the device will enter exclusion mode. And the LED will flash on and off with yellow alternately five times within 2 seconds.
Note: to use the reset procedure only when the primary controller is missing or inoperable. Restore the Device (Smart Plug) to Factory Default Settings Reset procedure will delete all information on the Z‐Wave network and Z‐Wave controller or Z‐Wave Gateway, and restore the sensor to factory default settings. 1.Make sure the sensor is powered. 2.Press and hold the button more than 10 seconds until the LED blink with red color. 3.Release the button.
| Type | Value(s) |
|---|
| Group | Type |
|---|---|
| Power Management | (Refer to parameters): State idle |
| Meter type |
|---|
| Electric Meter Consumption |