Philio Technology
Датчик открытия (Door sensor)
PST02-5C
Notification Sensor
HW: 1 FW: 1.29:01.20
SD3502
6.51.02
0x013C (316)
0x0002 (2)
0x000E (14)
ZC10-18036036
2018-03-06 03:12:52.03508
N/A
Enhanced 232 Slave
Reporting Sleeping Slave
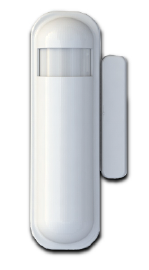
The slim multisensor PST02-1C has door/window, temperature and illumination, 3 sensors function in one,based on Z-Wave technology
The slim multisensor PST02-1C has door/window, temperature and illumination, 3 sensors function in one,based on Z-Wave technology It is the Z-WaveTM plus product, it support the security, OTA... Those newest features of the Z-WaveTM technology. Z-WaveTM is a wireless communication protocol designed for home automation, specifically to remotely control applications in residential and light commercial environments. The technology uses a low-power RF radio embedded or retrofitted into home electronics devices and systems, such as lighting, home access control, entertainment systems and household appliances.


2 - Basic Set Level
Setting the BASIC command value to turn on the light. The 0xFF(-1) means turn on the light. For dimmer equipment 1 to 100 means the light strength. 0 means turn off the light. Caution: The value is unsigned byte, the range is from 0x00 ~ 0xFF.Size: 1 byte
Default: -127
Minimum: 0
Maximum: 0
Possible values
| From | To | Desription |
|---|---|---|
| -127 | 127 | Setting the BASIC command value to turn on the light. The 0xFF(-1) means turn on the light. For dimmer equipment 1 to 100 means the light strength. 0 means turn off the light. Caution: The value is unsigned byte, the range is from 0x00 ~ 0xFF. |
4 - Light Threshold
Setting the illumination threshold to turn on the light. When the event triggered and the environment illumination lower then the threshold, the device will turn on the light. 0 means turn off illumination detected function. And never turn on the light. 1 means darkest. 99 means brightest. 100 means turn off illumination detected function. And always turn on the light. Notice: In none test mode, only the value in 1 to 99 will enable the illumination detected function and update the illumination value.Size: 1 byte
Default: 99
Minimum: 0
Maximum: 0
Possible values
| From | To | Desription |
|---|---|---|
| 0 | 100 | Setting the illumination threshold to turn on the light. When the event triggered and the environment illumination lower then the threshold, the device will turn on the light. 0 means turn off illumination detected function. And never turn on the light. 1 means darkest. 99 means brightest. 100 means turn off illumination detected function. And always turn on the light. Notice: In none test mode, only the value in 1 to 99 will enable the illumination detected function and update the illumination value. |
5 - Operation Mode
Operation mode. Using bit to control. Caution: The value is unsigned byte, the range is from 0x00 ~ 0xFF. Bit1: 1 means test mode, 0 means normal mode. Notice: This bit only effect by the DIP Switch setting to “customer mode”, otherwise it decides by DIP Switch setting to Test or Normal Mode. Bit2: Disable the door/window function. (1:Disable, 0:Enable) Bit3: Setting the temperature scale. 0: Fahrenheit, 1:Celsius Bit4: Disable the illumination report after event triggered. (1:Disable, 0:Enable) Bit5: Disable the temperature report after event triggered. (1:Disable, 0:Enable)Size: 1 byte
Default: 0
Minimum: 0
Maximum: 0
Possible values
| From | To | Desription |
|---|---|---|
| 1 | 1 | Bit1: 1 means test mode, 0 means normal mode. Notice: This bit only effect by the DIP Switch setting to “customer mode”, otherwise it decides by DIP Switch setting to Test or Normal Mode. |
| 2 | 2 | Disable the door/window function. (1:Disable, 0:Enable) |
| 3 | 3 | Bit3: Setting the temperature scale. 0: Fahrenheit, 1:Celsius |
| 4 | 4 | Bit4: Disable the illumination report after event triggered. (1:Disable, 0:Enable) |
| 5 | 5 | Bit5: Disable the temperature report after event triggered. (1:Disable, 0:Enable) |
6 - Mult- Sensor Function Switch
Multisensor function switch. Using bit to control. Caution: The value is unsigned byte, the range is from 0x00 ~ 0xFF. Bit0: Disable magnetic integrate illumination to turn ON the lighting nodes in the association group 2. (1:Disable, 0:Enable) Bit4: Disable delay 5 seconds to turn off the light, when door/window Bit5: Disable auto turn off the light, after door/window opened to turn on the light. (1:Disable, 0:Enable) Notice: If bit2 is zero, this setting is useless. Notice: If the configuration No.9 is zero, this setting is useless.Size: 1 byte
Default: 4
Minimum: 0
Maximum: 0
Possible values
| From | To | Desription |
|---|---|---|
| 0 | 0 | Bit0: Disable magnetic integrate illumination to turn ON the lighting nodes in the association group 2. (1:Disable, 0:Enable) |
| 4 | 4 | Bit4: Disable delay 5 seconds to turn off the light, when door/window |
| 5 | 5 | Bit5: Disable auto turn off the light, after door/window opened to turn on the light. (1:Disable, 0:Enable) Notice: If bit2 is zero, this setting is useless. Notice: If the configuration No.9 is zero, this setting is useless. |
7 - Customer Function
Customer function switch, using bit control. Caution: The value is unsigned byte, the range is from 0x00 ~ 0xFF Bit3: Disable send out BASIC OFF after door closed. (1:Disable, 0:Enable) Bit4: Notification Type, 0: Using Notification Report. 1: Using Sensor Binary Report Bit5: Disable Multi CC in auto report. (1:Disable, 0:Enable) Bit6: Disable to report battery state when the device triggered. (1:Disable, 0:Enable)Size: 1 byte
Default: 4
Minimum: 0
Maximum: 0
Possible values
| From | To | Desription |
|---|---|---|
| 3 | 3 | Bit3: Disable send out BASIC OFF after door closed. (1:Disable, 0:Enable) |
| 4 | 4 | Bit4: Notification Type, 0: Using Notification Report. 1: Using Sensor Binary Report |
| 5 | 5 | Bit5: Disable Multi CC in auto report. (1:Disable, 0:Enable) |
| 6 | 6 | Bit6: Disable to report battery state when the device triggered. (1:Disable, 0:Enable) |
9 - Turn Off Light Time
After turn on the lighting, setting the delay time to turn off the lighting when the PIR motion is not detected. 8 seconds per tick, default tick is 4 (32 seconds). 0 means never send turn off light commandSize: 1 byte
Default: 4
Minimum: 0
Maximum: 0
Possible values
| From | To | Desription |
|---|---|---|
| 0 | 127 | After turn on the lighting, setting the delay time to turn off the lighting when the PIR motion is not detected. 8 seconds per tick, default tick is 4 (32 seconds). 0 means never send turn off light command |
10 - Auto Report Battery Time
The interval time for auto report the battery level. 0 means turn off auto report battery. The default value is 12. The tick time can setting by the configuration No.20.Size: 1 byte
Default: 12
Minimum: 0
Maximum: 0
Possible values
| From | To | Desription |
|---|---|---|
| 0 | 127 | The interval time for auto report the battery level. 0 means turn off auto report battery. The default value is 12. The tick time can setting by the configuration No.20. |
11 - Auto Report Door/Windo w State Time
The interval time for auto report the door/window state. 0 means turn off auto report door/window state. The default value is 12. The tick time can setting by the configuration No.20.Size: 1 byte
Default: 12
Minimum: 0
Maximum: 0
Possible values
| From | To | Desription |
|---|---|---|
| 0 | 127 | The interval time for auto report the door/window state. 0 means turn off auto report door/window state. The default value is 12. The tick time can setting by the configuration No.20. |
12 - Auto Report Illumination Time
The interval time for auto report the illumination. 0 means turn off auto report illumination. The default value is 12. The tick time can setting by the configuration No.20.Size: 1 byte
Default: 12
Minimum: 0
Maximum: 0
Possible values
| From | To | Desription |
|---|---|---|
| 0 | 127 | The interval time for auto report the illumination. 0 means turn off auto report illumination. The default value is 12. The tick time can setting by the configuration No.20. |
13 - Auto Report Temperatur e Time
The interval time for auto report the temperature. 0 means turn off auto report temperature. The default value is 12. The tick time can setting by the configuration No.20.Size: 1 byte
Default: 12
Minimum: 0
Maximum: 0
Possible values
| From | To | Desription |
|---|---|---|
| 0 | 127 | The interval time for auto report the temperature. 0 means turn off auto report temperature. The default value is 12. The tick time can setting by the configuration No.20. |
20 - Auto Report Tick Interval
The interval time for auto report each tick. Setting this configuration will effect configuration No.10, No.11, No.12 and No.13. The unit is 1 minute. Caution1: Setting to 0 means turn off all auto report function. Caution2: The value is unsigned byte, the range is from 0x00 ~ 0xFFSize: 1 byte
Default: 30
Minimum: 0
Maximum: 0
Possible values
| From | To | Desription |
|---|---|---|
| -127 | 127 | The interval time for auto report each tick. Setting this configuration will effect configuration No.10, No.11, No.12 and No.13. The unit is 1 minute. Caution1: Setting to 0 means turn off all auto report function. Caution2: The value is unsigned byte, the range is from 0x00 ~ 0xFF |
21 - Temperature Differential Report
The temperature differential to report. 0 means turn off this function. The unit is Fahrenheit. Enable this function the device will detect every minutes. And when the temperature is over 140 degree Fahrenheit, it will continue report. Enable this functionality will cause some issue please see the detail in the “Temperature Report” section.Size: 1 byte
Default: 1
Minimum: 0
Maximum: 0
Possible values
| From | To | Desription |
|---|---|---|
| 0 | 127 | The temperature differential to report. 0 means turn off this function. The unit is Fahrenheit. Enable this function the device will detect every minutes. And when the temperature is over 140 degree Fahrenheit, it will continue report. Enable this functionality will cause some issue please see the detail in the “Temperature Report” section. |
22 - Illumination Differential Report
The illumination differential to report. 0 means turn off this function. The unit is percentage. Enable this function the device will detect every minutes. Enable this functionality will cause some issue please see the detail in the “Illumination Report” section.Size: 1 byte
Default: 0
Minimum: 0
Maximum: 0
Possible values
| From | To | Desription |
|---|---|---|
| 0 | 99 | The illumination differential to report. 0 means turn off this function. The unit is percentage. Enable this function the device will detect every minutes. Enable this functionality will cause some issue please see the detail in the “Illumination Report” section. |
1. Have Z-WaveTM Controller enter inclusion mode. 2. Pressing tamper key three times within 1.5 seconds will enter the inclusion mode. 3. After add successful, the device will wake to receive the setting command from Z-WaveTM Controller, about 20 seconds
1. Have Z-WaveTM Controller enter exclusion mode. 2. Pressing tamper key three times within 1.5 seconds will enter the exclusion mode. Node ID has been excluded.
After the device adding to the network, it will wake-up once per day in default. When it wakes-up it will broadcast the “Wake Up Notification” message to the network, and wake-up 10 seconds to receive the setting commands. The wake-up interval minimum setting is 30 minutes, and maximum setting is 120 hours. And the interval step is 30 minutes. If the user want to wake-up the device immediately, please remove the front cover, and press the tamper key once. The device will wake-up 10 seconds.
Notice: Use this procedure only in the event that the primary controller is lost or otherwise inoperable. 1. Pressing tamper key four times within 1.5 seconds and do not release the tamper key on the 4th press, the LED lite will ON. 2. After 3 seconds the LED will turn OFF, after that within 2 seconds, release the tamper key. If successful, the LED will light ON one second. Otherwise, the LED will flash once. 3. IDs are excluded and all settings will reset to factory default.
| Type | Value(s) |
|---|
| Group | Type |
|---|---|
| Home Security | (Refer to parameters): State idle |
| Sensor type |
|---|
| Air Temperature |
| Illuminance |