GE
4 Scene Z-Wave controller
34176/ZW5306
Remote Control - Multi Purpose
HW: 255 FW: 5.05
ZM5202
6.51.09
0x0063 (99)
0x4843 (18499)
0x3035 (12341)
ZC10-18096226
2018-09-03 16:25:14.65583
N/A
Portable Controller
Portable Controller
Yes
Custom lighting control is at your fingertips with the GE-branded Z-Wave Wireless Quad Scene Remote.
Custom lighting control is at your fingertips with the GE-branded Z-Wave Wireless Quad Scene Remote. This versatile remote communicates directly with your Z-Wave devices to create four unique, one touch lighting scenes as well as to wirelessly dim or brighten light levels in your home. Once the remote is paired with your devices, you can begin programming the lights to personalize your indoor space. The wireless lighting control has a range of up to 150 feet and can control as many as twenty Z-Wave enabled devices per scene. Enjoy a variety of placement options for your lighting control – utilize the included hardware and standard wallplate for wall mounting, detach the remote from the magnetic wall mount for instant portability or pair the remote with a separate stand for convenient tabletop use. The remote also functions on a scalable system, giving you the freedom to start with one remote and add as many as you need. Take control of your lights with the Z-Wave Wireless Quad Scene Remote.
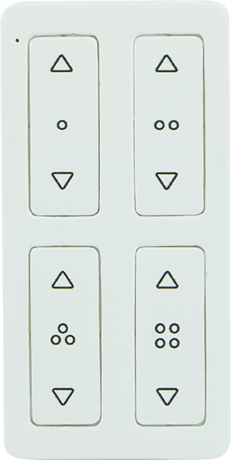
Product Picture
This will copy the network and device information from your existing hub/primary controller to the scene controller, making it a secondary controller. 1. Following the manufacturers guidelines to place your existing primary controller or hub into inclusion mode. 2. Press and hold the ""^"" button on Scene 1 and Scene 3 for three (3) seconds. The LED will slowly flash every second. 3. Press and hold the ""^"" button on Scene 2 and Scene 4 for three (3) seconds. The LED will flash for ten (10) seconds. 4. Press and release the ""v"" button on Scene 1 to set the device as a receiver. The LED will slowly flash every second. If network transfer was successful, the LED will turn on for two (2) seconds.
1. Press and hold the ""^"" button on Scene 1 and Scene 3 for three (3) seconds. The LED will slowly flash every second. 2. Press and hold the ""v"" button on Scene 1 and Scene 3 for three (3) seconds. The LED will light for two (2) seconds. If the setup is successful, the keypad will stay awake for 30 seconds. During sleep mode, the controller will sleep again within two (2) seconds after any button is pressed.
Note: All Z-Wave device connections and scenes will be lost in the reset. If the controller is setup as the primary controller after performing a reset, each Z-Wave device that was previously in the network will need to be individually reset or excluded from the network before it can be included again. The steps for resetting and reconnecting each smart device differ, please refer to the device manufacturer for reset instructions. If this controller is being used as a secondary controller in the network, use this procedure to reset this controller only in the event that the network primary controller is missing or otherwise inoperable. 1. Press and hold the ""^"" button on Scene 1 and Scene 3 for three (3) seconds. The LED will slowly flash every second. 2. Press and hold the ""v"" button on Scene 2 and Scene 4 for three (3) seconds. The LED will quickly flash three (3) times.
This step will add devices to a Scene button. You must complete all steps in this box within 20 seconds or the controller will time out. Please familiarize yourself with these steps before you begin programming. 1. Press and hold the ""^"" button on Scene 1 and Scene 3 for three (3) seconds. The LED will slowly flash every second. 2. Select the scene you want to add to the device. Press and release the ""^"" button on Scene 1, 2, 3 or 4. The LED will quickly flash for 20 seconds. 3. Locate the manual/program button on the Z-Wave module/switch you are adding to the scene controller. Follow the instructions for your Z-Wave device to add it to the scene (same as adding to a hub). The LED will quickly flash. 4. Using the manual/program button on the module/switch, adjust the light to your desired level of brightness. The LED will quickly flash. 5. Press and release the ""^"" button on Scene 1 to exit programming. The LED will turn on for two (2) seconds.
1. Press and hold the ""^"" button on Scene 1 and Scene 3 for three (3) seconds. The LED will slowly flash every second. 2. Select the scene you want to remove the device from. Press and release the ""^"" button on Scene 1, 2, 3 or 4. The LED will quickly flash for 20 seconds. 3. Press and release the manual/program button on the Z-Wave module/switch to remove it from network. The LED will turn on for two (2) seconds.
| Type | Value(s) |
|---|