Heatit controls
Heatit Z-Water
Z-Water
Valve
HW: 2 FW: 2.01
ZM5101
6.71.03
0x019B (411)
0x0003 (3)
0x020A (522)
ZC10-19036400
2019-03-16 01:10:07.879384
N/A
Enhanced 232 Slave
Always On Slave
Heatit Z-Water is a DIN-rail regulator for controlling hydronic heating. Heatit Z-Water is a module that clips right onto a DIN rail to add a variety of functions to your wireless Z-Wave network.
Heatit Z-Water is equipped with 10 relay outputs and 4 analog inputs, and a Z-Wave radio for interfacing to the wireless Z-Wave network. The regulator can be power supplied from a 230V AC mains connection, and is able to deliver an output supply of 24V DC. Heatit Z-Water relay outputs are able to be freely controlled from the Z-Wave network, and can be used for several purposes, e.g. on/off control of light, control of valve actuators for an underfloor heating system, or control of other home automation systems. Heatit Z-Water inputs are analog inputs for interfacing simple temperature sensors; NTC, PT1000, etc. It is possible to configure the level and the indication of the status indicator LED in the front of the Heatit Z-Water regulator.
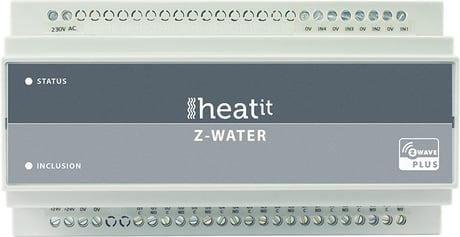
Product Picture


1 - Status LED
Configuration of the status LED.Size: 1 byte
Default: 1
Minimum: 0
Maximum: 3
Possible values
| From | To | Desription |
|---|---|---|
| 0 | 0 | LED turned off |
| 1 | 1 | LED turned on. (Default) |
| 2 | 2 | LED flashing at 1 second intervals (0.5 Hz). |
| 3 | 3 | LED flashing at 0.5 second interval (1 Hz). |
2 - Status LED brightness level
Configure the percentage of light in the status LED, when the LED is turned on.Size: 1 byte
Default: 50
Minimum: 0
Maximum: 100
Possible values
| From | To | Desription |
|---|---|---|
| 0 | 100 | Specifies the brightness level of the LED when it is on. Default is 50. |
3 - Thermistor type connected to input 1
This parameter decides which kind of thermistor that is connected to the input.Size: 1 byte
Default: 1
Minimum: 0
Maximum: 1
Possible values
| From | To | Desription |
|---|---|---|
| 0 | 0 | No thermistor, input is disabled. |
| 1 | 1 | 10K NTC. (PART NUMBER: TT02-10KC3-93D-3000R-TPH). (Default) |
4 - Thermistor type connected to input 2
This parameter decides which kind of thermistor that is connected to the input.Size: 1 byte
Default: 1
Minimum: 0
Maximum: 1
Possible values
| From | To | Desription |
|---|---|---|
| 0 | 0 | No thermistor, input is disabled. |
| 1 | 1 | 10K NTC. (PART NUMBER: TT02-10KC3-93D-3000R-TPH). (Default) |
5 - Thermistor type connected to input 3.
This parameter decides which kind of thermistor that is connected to the input.Size: 1 byte
Default: 1
Minimum: 0
Maximum: 1
Possible values
| From | To | Desription |
|---|---|---|
| 0 | 0 | No thermistor, input is disabled. |
| 1 | 1 | 10K NTC. (PART NUMBER: TT02-10KC3-93D-3000R-TPH). (Default) |
6 - Thermistor type connected to input 4
This parameter decides which kind of thermistor that is connected to the input.Size: 1 byte
Default: 1
Minimum: 0
Maximum: 1
Possible values
| From | To | Desription |
|---|---|---|
| 0 | 0 | 10K NTC. (PART NUMBER: TT02-10KC3-93D-3000R-TPH). (Default) |
| 1 | 1 | 10K NTC. (PART NUMBER: TT02-10KC3-93D-3000R-TPH). (Default) |
7 - Input 1 calibration
Configures the functionality of input 1.Size: 1 byte
Default: 0
Minimum: -40
Maximum: 40
Possible values
| From | To | Desription |
|---|---|---|
| -40 | 40 | -4.0 degrees C – 4.0 degrees C. Default is 0 (0.0 degrees C). |
8 - Input 2 calibration
Configures the functionality of input 2.Size: 1 byte
Default: 0
Minimum: -40
Maximum: 40
Possible values
| From | To | Desription |
|---|---|---|
| -40 | 40 | -4.0 degrees C – 4.0 degrees C. Default is 0 (0.0 degrees C). |
9 - Input 3 calibration
Configures the functionality of input 3.Size: 1 byte
Default: 0
Minimum: -40
Maximum: 40
Possible values
| From | To | Desription |
|---|---|---|
| -40 | 40 | -4.0 degrees C – 4.0 degrees C. Default is 0 (0.0 degrees C). |
10 - Input 4 calibration.
Configures the functionality of input 4.Size: 1 byte
Default: 0
Minimum: -40
Maximum: 40
Possible values
| From | To | Desription |
|---|---|---|
| -40 | 40 | -4.0 degrees C – 4.0 degrees C. Default is 0 (0.0 degrees C). |
11 - Input 1 report interval
Time interval between consecutive temperature reports. Temperature reports can be also sent as a result of polling.Size: 2 bytes
Default: 6
Minimum: 0
Maximum: 8640
Possible values
| From | To | Desription |
|---|---|---|
| 0 | 0 | Reporting of temperatures disabled. |
| 1 | 8640 | Multiply with 10 seconds, 10 seconds – 24 hours. Default is 6 (60 seconds). |
12 - Input 2 report interval
Time interval between consecutive temperature reports. Temperature reports can be also sent as a result of polling.Size: 2 bytes
Default: 6
Minimum: 0
Maximum: 8640
Possible values
| From | To | Desription |
|---|---|---|
| 0 | 0 | Reporting of temperatures disabled. |
| 1 | 8640 | Multiply with 10 seconds, 10 seconds – 24 hours. Default is 6 (60 seconds). |
13 - Input 3 report interval
Time interval between consecutive temperature reports. Temperature reports can be also sent as a result of polling.Size: 2 bytes
Default: 6
Minimum: 0
Maximum: 8640
Possible values
| From | To | Desription |
|---|---|---|
| 0 | 0 | Reporting of temperatures disabled. |
| 1 | 8640 | Multiply with 10 seconds, 10 seconds – 24 hours. Default is 6 (60 seconds). |
14 - Input 4 report interval
Time interval between consecutive temperature reports. Temperature reports can be also sent as a result of polling.Size: 2 bytes
Default: 6
Minimum: 0
Maximum: 8640
Possible values
| From | To | Desription |
|---|---|---|
| 0 | 0 | Reporting of temperatures disabled. |
| 1 | 8640 | Multiply with 10 seconds, 10 seconds – 24 hours. Default is 6 (60 seconds). |
Add Please refer to your primary controller manual on how to enter add mode. The device can only be added from the network if the primary controller is in add mode. When the primary controller is set to add modus press the ”INCLUSION” button once on the device.
Remove Please refer to your primary controller manual on how to enter remove mode. The device can only be removed from the network if the primary controller is in remove mode. When the primary controller is set to remove modus press the ”INCLUSION” button once on the device.
Heatit Z-Water can be factory reset by pressing the small button through the little hole, marked with the text “INCLUSION”, in front of the Heatit Z-Water regulator for at least 10 seconds. NOTE: Only use this procedure when the primary network controller is missing or is otherwise inoperable.
| Type | Value(s) |
|---|
| Sensor type |
|---|
| Air Temperature |