Zooz
5-Outlet Power Strip
ZEN20 VER. 2.0
Power Strip
HW: 1 FW: 1.00
ZM5202
6.71.03
0x027A (634)
0xA000 (40960)
0xA004 (40964)
ZC10-18116311
2018-11-16 19:09:29.84079
N/A
Enhanced 232 Slave
Always On Slave
Control 5 devices independently and monitor 2 USB ports via Z-Wave with this S2 Power Strip.
FEATURES: - Z-Wave on/off control of up to 5 electrical devices - On/off (charging/charged) reports from USB ports to the hub (no Z-Wave control) - turn off the charging device for best results - Energy monitoring for each of the 5 outlets - Built-in overload protection and ETL certification - Z-Wave Plus signal repeater to extend network range - S2 security protocol and the latest 500 Z-Wave chip for faster and safer wireless communication SPECS: - Model Number: ZEN20 VER. 2.0 - Z-Wave Signal Frequency: 908.42 MHz - Power: 120 VAC - Maximum Load: 15 A total (between 5 outlets) - Maximum Load for USB ports: 2.1 A total (between 2 ports) - Cord Length: 2 feet - Range: Up to 100 feet line of sight - Installation and Use: Indoor only
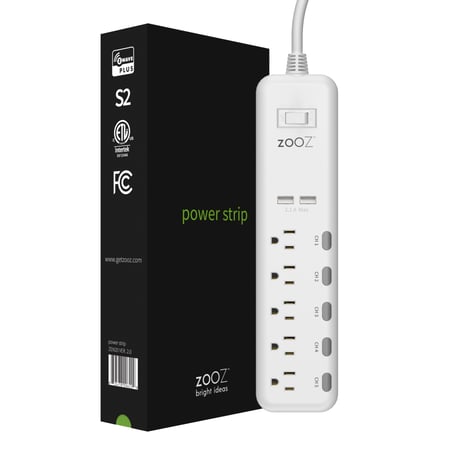
Product Picture


1 - On/Off Status Recovery Aer Power Failure
Choose the recovery state for your Power Strip’s outlets if power outage occurs.Size: 1 byte
Default: 0
Minimum: 0
Maximum: 0
Possible values
| From | To | Desription |
|---|---|---|
| 0 | 0 | Power Strip remembers the status for each outlet prior to power outage and turns back to it |
| 1 | 1 | Power Strip automatically turns ON for each outlet once power is restored (it does not remember the status prior to power outage) |
| 2 | 2 | Power Strip automatically turns OFF each outlet once power is restored (it does not remember the status prior to power outage) |
2 - Power Wattage Report Value Threshold
Choose how you want your Power Strip to report power consumption to your hub. The number entered as value corresponds to the number of Watts the appliance needs to go over for the change to be reported. So if 5 Watts are entered by default, the smart plug will report any change in power usage over 5 Watts for each outlet (whether it’s at least 5 Watts more or 5 Watts less compared to previous report).Size: 4 bytes
Default: 5
Minimum: 0
Maximum: 0
Possible values
| From | To | Desription |
|---|---|---|
| 0 | 0 | Power meter disabled |
| 1 | 65535 | Watts |
3 - Power Wattage Report Frequency
The number entered as value corresponds to the number of seconds. So if 30 is entered by default, the Strip will report power consumption (Wattage) every 30 seconds.Size: 4 bytes
Default: 30
Minimum: 0
Maximum: 0
Possible values
| From | To | Desription |
|---|---|---|
| 30 | 2678400 | seconds |
| 0 | 0 |
4 - Energy (kWh) Report Frequency
Choose how oen you want your Power Strip to report power consumption (W) to your controller (hub). The number entered as value corresponds to the number of seconds. So if 300 is entered by default, the power strip will report energy usage every 300 seconds (5 minutes).Size: 4 bytes
Default: 300
Minimum: 0
Maximum: 0
Possible values
| From | To | Desription |
|---|---|---|
| 30 | 2678400 | 2678400 |
| 0 | 0 |
5 - Overload Protection
Set the Watt level for overload protection to kick in. The number entered as the value corresponds to the total number of Watts the Strip needs to detect across all 5 outlets to turn off automatically and send a notification to the hub.Size: 2 bytes
Default: 1800
Minimum: 0
Maximum: 0
Possible values
| From | To | Desription |
|---|---|---|
| 0 | 0 | overload protection disabled |
| 1 | 1800 | Watts |
6 - Enable/ Disable Auto Turn-Off Timer for CH1
Use this parameter to enable or disable the auto turn-off timer for CH1 outlet. If this feature is enabled, the device connected to CH1 outlet will automatically turn off after a fixed period of time from being turned on (set in parameter 7).Size: 1 byte
Default: 0
Minimum: 0
Maximum: 0
Possible values
| From | To | Desription |
|---|---|---|
| 0 | 0 | timer disabled |
| 1 | 1 | timer enabled |
7 - Set Auto Turn-Off Timer for CH1
Use this parameter to set the time after which you want the device connected to CH1 outlet to automatically turn off once it has been turned on. The number entered as value corresponds to the number of minutes.Size: 4 bytes
Default: 60
Minimum: 0
Maximum: 0
Possible values
| From | To | Desription |
|---|---|---|
| 1 | 65535 | minutes |
8 - Enable/ Disable Auto Turn-On Timer for CH1
Use this parameter to enable or disable the auto turn-on timer for CH1 outlet. If this feature is enabled, the device connected to CH1 outlet will automatically turn on after a fixed period of time from being turned off (set in parameter 9).Size: 1 byte
Default: 0
Minimum: 0
Maximum: 0
Possible values
| From | To | Desription |
|---|---|---|
| 0 | 0 | timer disabled |
| 1 | 1 | timer enabled |
9 - Set Auto Turn-On Timer for CH1
Use this parameter to set the time after which you want the device connected to CH1 outlet to automatically turn on once it has been turned off. The number entered as value corresponds to the number of minutes.Size: 4 bytes
Default: 60
Minimum: 0
Maximum: 0
Possible values
| From | To | Desription |
|---|---|---|
| 1 | 65535 | minutes |
| 0 | 0 |
10 - Enable/ Disable Auto Turn-Off Timer for CH2
Use this parameter to enable or disable the auto turn-off timer for CH2 outlet.Size: 1 byte
Default: 0
Minimum: 0
Maximum: 0
Possible values
| From | To | Desription |
|---|---|---|
| 0 | 0 | timer disabled |
| 1 | 1 | timer enabled |
11 - Set Auto Turn-Off Timer for CH2
Use this parameter to set the time after which you want the device connected to CH2 outlet to automatically turn off once it has been turned on. The number entered as value corresponds to the number of minutes.Size: 4 bytes
Default: 60
Minimum: 0
Maximum: 0
Possible values
| From | To | Desription |
|---|---|---|
| 1 | 65535 | minutes |
12 - Enable/ Disable Auto Turn-On Timer for CH2
Use this parameter to enable or disable the auto turn-on timer for CH2 outlet.Size: 1 byte
Default: 0
Minimum: 0
Maximum: 0
Possible values
| From | To | Desription |
|---|---|---|
| 0 | 0 | timer disabled |
| 1 | 1 | timer enabled |
13 - Set Auto Turn-On Timer for CH2
Use this parameter to set the time after which you want the device connected to CH2 outlet to automatically turn on once it has been turned off. The number entered as value corresponds to the number of minutes.Size: 4 bytes
Default: 60
Minimum: 0
Maximum: 0
Possible values
| From | To | Desription |
|---|---|---|
| 1 | 65535 | minutes |
| 0 | 0 |
14 - Enable/ Disable Auto Turn-Off Timer for CH3
Use this parameter to enable or disable the auto turn-off timer for CH3 outlet.Size: 1 byte
Default: 0
Minimum: 0
Maximum: 0
Possible values
| From | To | Desription |
|---|---|---|
| 0 | 0 | timer disabled |
| 1 | 1 | timer enabled |
15 - Set Auto Turn-Off Timer for CH3
Use this parameter to set the time after which you want the device connected to CH3 outlet to automatically turn off once it has been turned on. The number entered as value corresponds to the number of minutes.Size: 4 bytes
Default: 60
Minimum: 0
Maximum: 0
Possible values
| From | To | Desription |
|---|---|---|
| 1 | 65535 | minutes |
16 - Enable/ Disable Auto Turn-On Timer for CH3
Use this parameter to enable or disable the auto turn-on timer for CH3 outlet.Size: 1 byte
Default: 0
Minimum: 0
Maximum: 0
Possible values
| From | To | Desription |
|---|---|---|
| 0 | 0 | timer disabled |
| 1 | 1 | timer enabled |
17 - Set Auto Turn-On Timer for CH3
Use this parameter to set the time after which you want the device connected to CH3 outlet to automatically turn on once it has been turned off. The number entered as value corresponds to the number of minutes.Size: 4 bytes
Default: 60
Minimum: 0
Maximum: 0
Possible values
| From | To | Desription |
|---|---|---|
| 1 | 65535 | minutes |
| 0 | 0 |
18 - Enable/ Disable Auto Turn-Off Timer for CH4
Use this parameter to enable or disable the auto turn-off timer for CH4 outlet.Size: 1 byte
Default: 0
Minimum: 0
Maximum: 0
Possible values
| From | To | Desription |
|---|---|---|
| 0 | 0 | timer disabled |
| 1 | 1 | timer enabled |
19 - Set Auto Turn-Off Timer for CH4
Use this parameter to set the time after which you want the device connected to CH4 outlet to automatically turn off once it has been turned on. The number entered as value corresponds to the number of minutes.Size: 4 bytes
Default: 60
Minimum: 0
Maximum: 0
Possible values
| From | To | Desription |
|---|---|---|
| 1 | 65535 | minutes |
20 - Enable/ Disable Auto Turn-On Timer for CH4
Use this parameter to enable or disable the auto turn-on timer for CH4 outlet.Size: 1 byte
Default: 0
Minimum: 0
Maximum: 0
Possible values
| From | To | Desription |
|---|---|---|
| 0 | 0 | timer disabled |
| 1 | 1 | timer enabled |
21 - Set Auto Turn-On Timer for CH4
Use this parameter to set the time after which you want the device connected to CH4 outlet to automatically turn on once it has been turned off. The number entered as value corresponds to the number of minutes.Size: 4 bytes
Default: 60
Minimum: 0
Maximum: 0
Possible values
| From | To | Desription |
|---|---|---|
| 1 | 65535 | minutes |
22 - Enable/ Disable Auto Turn-Off Timer for CH5
Use this parameter to enable or disable the auto turn-off timer for CH5 outlet.Size: 1 byte
Default: 0
Minimum: 0
Maximum: 0
Possible values
| From | To | Desription |
|---|---|---|
| 0 | 0 | timer disabled |
| 1 | 1 | timer enabled |
23 - Set Auto Turn-Off Timer for CH5
Use this parameter to set the time after which you want the device connected to CH5 outlet to automatically turn off once it has been turned on. The number entered as value corresponds to the number of minutes.Size: 4 bytes
Default: 60
Minimum: 0
Maximum: 0
Possible values
| From | To | Desription |
|---|---|---|
| 1 | 65535 | minutes |
24 - Enable/ Disable Auto Turn-On Timer for CH5
Use this parameter to enable or disable the auto turn-on timer for CH5 outlet.Size: 1 byte
Default: 0
Minimum: 0
Maximum: 0
Possible values
| From | To | Desription |
|---|---|---|
| 0 | 0 | timer disabled |
| 1 | 1 | timer enabled |
25 - Set Auto Turn-On Timer for CH5
Use this parameter to set the time after which you want the device connected to CH5 outlet to automatically turn on once it has been turned off. The number entered as value corresponds to the number of minutes.Size: 4 bytes
Default: 60
Minimum: 0
Maximum: 0
Possible values
| From | To | Desription |
|---|---|---|
| 1 | 65535 | minutes |
26 - Manual Control
Choose if you want to use the physical buttons on Strip to turn the outlets on or off manually or if you want to disable this function. If this parameter is set to 0 (disabled), you will only be able to turn any of the outlets on or off remotely using your Z-Wave gateway controller.Size: 1 byte
Default: 1
Minimum: 0
Maximum: 0
Possible values
| From | To | Desription |
|---|---|---|
| 0 | 0 | manual control disabled for all outlets |
| 1 | 1 | manual control enabled for all outlets |
27 - LED Indicator Mode
Choose if you want the LED indicators next to each outlet to come on when power is on or off, or if you want to disable the LED lights.Size: 1 byte
Default: 1
Minimum: 0
Maximum: 0
Possible values
| From | To | Desription |
|---|---|---|
| 0 | 0 | LED indicator is on when power is of and off when power is on |
| 1 | 1 | LED indicator is on when power is on and off when power is off |
| 2 | 2 | LED indicator is always off, regardless of power status. |
1. Plug the Power Strip into a grounded receptacle you’re planning to use it at (it doesn’t need to be close to the hub) 2. Initiate inclusion (pairing) in the app (or web interface). 3. CLICK CH1 BUTTON 3 TIMES QUICKLY. All LED indicators will start flashing 4. You will see 7 or 8 new on/off devices in your app: 5 channels or on/off control, 2 channels for on/off monitoring (USB ports reporting charging/ charged status, no control), and possibly one master node to access and adjust advanced settings in.
1. Bring the strip within direct range of your Z-Wave gateway (hub). 2. Put the Z-Wave hub into exclusion mode. 3. Press and release the CH1 button 3 times quickly. 4. Your hub will confirm exclusion and all of the channels (child outlets) and the main device will disappear from your controller's device list.
If your primary controller is missing or inoperable, you may need to reset the device to factory settings. To complete the reset process manually, click-click-click’n’hold CH1 button for at least 10 seconds. All LED indicators will flash to confirm successful reset. NOTE: All previously recorded activity and custom settings EXCEPT for the kWh record will be erased from the device’s memory.
USB Ports will report on/off when a connected device is charging or charged.
| Type | Value(s) |
|---|
| Group | Type |
|---|---|
| Power Management | (Refer to parameters): State idle |
| Meter type |
|---|
| Electric Meter Consumption |