Good Way Technology, Co., Ltd
Roller Shutter Multi Level Switch
Roller Shutter/TD11000Z2
Window Covering - Pos/End Aware
HW: 1 FW: 2.00
ZM5101
6.81.00
0x0068 (104)
0x0003 (3)
0x0014 (20)
ZC10-19036390
2019-03-06 07:26:57.492468
N/A
Enhanced 232 Slave
Always On Slave
Z-Wave Roller Shutter Controller is an ideal for the remotely electric motor controller
Z-Wave Roller Shutter Controller is an ideal for the remotely electric motor controller. It is used to control the motors of rollers, shades, blinds, venetian blinds and similar sun shade, which are single phase AC powered. The module can be controlled either through a Z-Wave network or through the wall switch, and measures power consumption of motor.
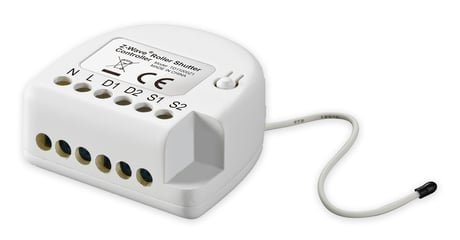
Product Picture


1 - Positioning Calibration
Positioning Calibration: 0: Disable 1: Executing calibrationSize: 1 byte
Default: 0
Minimum: 0
Maximum: 0
Possible values
| From | To | Desription |
|---|---|---|
| 0 | 1 | Positioning Calibration |
2 - External switch Protection
External switch Protection: 0: Enable external switch 1: Disable external switchSize: 1 byte
Default: 0
Minimum: 0
Maximum: 0
Possible values
| From | To | Desription |
|---|---|---|
| 0 | 1 | External switch Protection |
3 - When the door is opened, set the delay time for automatic closing.
When the door is opened, set the delay time for automatic closing. 0: Disable automatic closing 1 - 32767: The door will be closed automatically in 1 - 32767secSize: 2 bytes
Default: 0
Minimum: 0
Maximum: 0
Possible values
| From | To | Desription |
|---|---|---|
| 0 | 32767 | delay time |
4 - When the door is open, set the delay time for automatic notification
When the door is open, set the delay time for automatic notification 0: Disable automatic notification 1 - 32767: The notification will be sent automatically in 1 - 32767secSize: 2 bytes
Default: 0
Minimum: 0
Maximum: 0
Possible values
| From | To | Desription |
|---|---|---|
| 0 | 32767 | delay time |
5 - Set the operation mode
Set the operation mode: 0: Roller Shutter 1: Venetian (up/down and slate rotation)Size: 1 byte
Default: 0
Minimum: 0
Maximum: 0
Possible values
| From | To | Desription |
|---|---|---|
| 0 | 1 | Set the operation mode |
6 - Set the angle of blinds
Angles of blinds 0:0∘ 1:30∘ 2:60∘ 3:90∘ 4:120∘ 5:150∘ 6:180∘Size: 1 byte
Default: 0
Minimum: 0
Maximum: 0
Possible values
| From | To | Desription |
|---|---|---|
| 0 | 6 | Set the angle of blinds |
7 - Set the slats turning time
Set the slats turning time: 1 - 127: 0.1 - 12.7 secSize: 1 byte
Default: 15
Minimum: 0
Maximum: 0
Possible values
| From | To | Desription |
|---|---|---|
| 1 | 127 | Set the slats turning time |
8 - Set the delay time to start the motor up to the blade
Set the delay time to start the motor up to the blade: 0: No offset time 1 - 127: 0.1 - 12.7 secSize: 1 byte
Default: 0
Minimum: 0
Maximum: 0
Possible values
| From | To | Desription |
|---|---|---|
| 0 | 127 | delay time |
9 - Set the delay time to start the motor down to the blade
Set the delay time to start the motor down to the blade. 0: No offset time 1 - 127: 0.1 – 12.7 secSize: 1 byte
Default: 0
Minimum: 0
Maximum: 0
Possible values
| From | To | Desription |
|---|---|---|
| 0 | 127 | delay time |
10 - Set the power changed percentage to send the power report
Set the power changed percentage to send the power report. 0: Disabled 1 - 100: 1% - 100%Size: 1 byte
Default: 0
Minimum: 0
Maximum: 0
Possible values
| From | To | Desription |
|---|---|---|
| 0 | 100 | changed range |
11 - Set the time interval of reporting watts in seconds
Set the time interval of reporting watts in seconds. 0: Disable 60 - 32767: 60 - 32767secSize: 2 bytes
Default: 300
Minimum: 0
Maximum: 0
Possible values
| From | To | Desription |
|---|---|---|
| 0 | 0 | disable |
| 60 | 32767 | times |
12 - Set the time interval of reporting KWH in seconds
Set the time interval of reporting KWH in seconds. 0: Disable 60 - 32767: 60 - 32767secSize: 1 byte
Default: 3600
Minimum: 0
Maximum: 0
Possible values
| From | To | Desription |
|---|---|---|
| 0 | 0 | disable |
| 60 | 32767 | times |
1. Put the Z-Wave Controller into inclusion mode, and press the pairing button 3 times in 2 seconds to include the module. 2. Put the Z-Wave Controller into inclusion mode, and press the “external swtich1” or “external swtich2” 3 times in 2 seconds to include the module.
1. Put the Z-Wave Controller into exclusion mode, and press the pairing button 3 times in 2 seconds to exclude the device. 2. Put the Z-Wave Controller into inclusion mode, and press the “external swtich1” or “external swtich2” 3 times in 2 seconds to include the module.
1. Press the pairing button 3 times in 2 seconds and press and hold the pairing button for more than 5 seconds at the 3rd time. 2. The module is excluded and restores to factory default setting. 3. Then the module will be in auto-inclusion mode for 2 minutes. Please use this procedure only when the network primary controller is missing or otherwise inoperable.
| Type | Value(s) |
|---|
| Meter type |
|---|
| Electric Meter Consumption |