Zooz
Double Switch
ZEN30
Light Dimmer Switch
HW: 2 FW: 1.00
ZM5202
6.82.00
0x027A (634)
0xa000 (40960)
0xa008 (40968)
ZC10-20026859
2020-02-03 15:40:26.931039
N/A
Enhanced 232 Slave
Always On Slave
A dimmer and 15 A relay in one wall switch, this Double Switch is an easy replacement for your existing double wall switch.
PRODUCT FEATURES: - Manual or Z-Wave control of 2 separate loads (dimmer + relay) - Perfect replacement for a fan / light combo (neutral wire required) - Scene control for multi-tap scenarios on select hubs - Quick and easy pigtail wire installation (single pole only) - 4-color LED indicator and air-gap switch for added safety - Fully customizable dimming features including ramp rate, on brightness level, and double tap to full brightness - Remembers and restores on/off status aer power failure - Built-in Z-Wave Plus signal repeater to extend network range - S2 security protocol and 500 Z-Wave chip SPECIFICATIONS: - Model Number: ZEN30 - Z-Wave Signal Frequency: 908.42 MHz - Power: 120 VAC, 60 Hz - Dimmer Max Load: 75 W LED, 250 W incandescent; DON’T use with tube lights, DC powered fixtures, or chandeliers - Relay Max Load: 15 A (1/2 HP) - Operating Temperature: 32-104° F (0-40° C) - Installation and Use: Indoor only
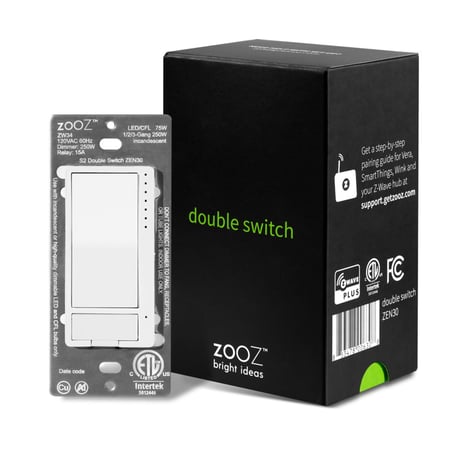
Product Image


1 - LED Indicator Mode for Dimmer
Choose if you want the LED indicator to turn on when the switch (light) is on or off, or if you want it to remain on or off at all times. This setting is for the top status indicator only.Size: 1 byte
Default: 0
Minimum: 0
Maximum: 3
Possible values
| From | To | Desription |
|---|---|---|
| 0 | 0 | LED indicator is on when switch is off, LED indicator is off when switch is on (default); |
| 1 | 1 | LED indicator is on when switch is on, LED indicator is off when switch is off; |
| 2 | 2 | LED indicator is always OFF and LED’s don’t indicate brightness level during dimming; |
| 3 | 3 | LED indicator is always ON. |
2 - LED Indicator Control for Relay
Choose if you want the LED indicator to turn on when the relay is on or off, or if you want it to remain on or off at all timesSize: 1 byte
Default: 0
Minimum: 0
Maximum: 3
Possible values
| From | To | Desription |
|---|---|---|
| 0 | 0 | LED indicator is on when relay is off, LED indicator is off when relay is on (default); |
| 1 | 1 | LED indicator is on when relay is on, LED indicator is off when relay is off; |
| 2 | 2 | LED indicator is always OFF |
| 3 | 3 | LED indicator is always ON |
3 - LED Indicator Color for Dimmer
Choose the color of the LED indicators for the dimmer.Size: 1 byte
Default: 0
Minimum: 0
Maximum: 3
Possible values
| From | To | Desription |
|---|---|---|
| 0 | 0 | white |
| 1 | 1 | blue |
| 2 | 2 | green |
| 3 | 3 | red |
4 - LED Indicator Color for Relay
Choose the color of the LED indicator for the relay.Size: 1 byte
Default: 0
Minimum: 0
Maximum: 3
Possible values
| From | To | Desription |
|---|---|---|
| 0 | 0 | white |
| 1 | 1 | blue |
| 2 | 2 | green |
| 3 | 3 | red |
5 - LED Indicator Brightness for Dimmer
Choose the LED indicators’ brightness level for the dimmer.Size: 1 byte
Default: 1
Minimum: 0
Maximum: 2
Possible values
| From | To | Desription |
|---|---|---|
| 0 | 0 | bright (100%) |
| 1 | 1 | medium (60%) |
| 2 | 2 | low (30%) |
6 - LED Indicator Brightness for Relay
Choose the LED indicators’ brightness level for the relay.Size: 1 byte
Default: 1
Minimum: 0
Maximum: 2
Possible values
| From | To | Desription |
|---|---|---|
| 0 | 0 | bright (100%) |
| 1 | 1 | medium (60%) |
| 2 | 2 | low (30%) |
7 - LED Indicator Mode for Scene Control
Choose if you want the LED indicators next to the dimmer light up when a scene is selected. You’ll see 1 to 5 LED’s light up for 1 – 5 tap triggers and 6 LED’s light up for the press-and-hold trigger of any paddle / button used.Size: 1 byte
Default: 1
Minimum: 0
Maximum: 1
Possible values
| From | To | Desription |
|---|---|---|
| 0 | 0 | LED’s enabled to indicate scene triggers; |
| 1 | 1 | LED’s disabled to indicate scene triggers (default). |
8 - Auto Turn-Off Timer for Dimmer
Use this parameter to set the time aer which you want the dimmer to automatically turn off once it has been turned on. The number entered as value corresponds to the number of minutes.Size: 4 bytes
Default: 0
Minimum: 0
Maximum: 65535
Possible values
| From | To | Desription |
|---|---|---|
| 0 | 0 | timer disabled |
| 1 | 65535 | minutes |
9 - Auto Turn-On Timer for Dimmer
Use this parameter to set the time aer which you want the dimmer to automatically turn on once it has been turned off. The number entered as value corresponds to the number of minutes.Size: 4 bytes
Default: 0
Minimum: 0
Maximum: 65535
Possible values
| From | To | Desription |
|---|---|---|
| 0 | 0 | timer disabled |
| 1 | 65535 | minutes |
10 - Auto Turn-Off Timer for Relay
Use this parameter to set the time aer which you want the relay to automatically turn off once it has been turned on. The number entered as value corresponds to the number of minutes.Size: 4 bytes
Default: 0
Minimum: 0
Maximum: 65535
Possible values
| From | To | Desription |
|---|---|---|
| 0 | 0 | timer disabled |
| 1 | 65535 | minutes |
11 - Auto Turn-On Timer for Relay
Use this parameter to set the time aer which you want the relay to automatically turn on once it has been turned off. The number entered as value corresponds to the number of minutes.Size: 4 bytes
Default: 0
Minimum: 0
Maximum: 65535
Possible values
| From | To | Desription |
|---|---|---|
| 0 | 0 | timer disabled |
| 1 | 65535 | minutes |
12 - On Off Status Aer Power Failure
Set the on off status of the device aer power failure.Size: 1 byte
Default: 3
Minimum: 0
Maximum: 8
Possible values
| From | To | Desription |
|---|---|---|
| 0 | 0 | dimmer and relay forced to OFF (regardless of state prior to power outage); |
| 1 | 1 | dimmer forced to off, relay forced to on; |
| 2 | 2 | dimmer forced to on, relay forced to off; |
| 3 | 3 | remembers and restores on/off status for dimmer and relay aer power failure (default); |
| 4 | 4 | remembers and restores on/off status for dimmer, relay forced to on; |
| 5 | 5 | remembers and restores on/off status for dimmer, relay forced to off; |
| 6 | 6 | dimmer forced to on, remembers and restores on/off status for relay; |
| 7 | 7 | dimmer forced to off, remembers and restores on/off status for relay; |
| 8 | 8 | dimmer and relay forced to ON. |
13 - Ramp Rate Control for Dimmer
Adjust the ramp rate for the dimmer (fade-in / fade-out effect for on / off operation). Values correspond to the number of seconds it take for the dimmer to reach full brightness or turn off when operated manually.Size: 1 byte
Default: 1
Minimum: 0
Maximum: 99
Possible values
| From | To | Desription |
|---|---|---|
| 0 | 0 | instant on/off; |
| 1 | 99 | seconds |
14 - Minimum Brightness
Set the minimum brightness level (in %) for the dimmer. You won’t be able to dim the light below the set value.Size: 1 byte
Default: 1
Minimum: 1
Maximum: 99
Possible values
| From | To | Desription |
|---|---|---|
| 1 | 99 | % brightness |
15 - Maximum Brightness
Set the maximum brightness level (in %) for the dimmer. You won’t be able to add brightness to the light beyond the set value. Note: if Parameter 17 is set to value 0, Parameter 15 is automatically disabled.Size: 1 byte
Default: 99
Minimum: 1
Maximum: 99
Possible values
| From | To | Desription |
|---|---|---|
| 1 | 99 | % brightness |
17 - Double Tap Function for Dimmer
Choose if you want the dimmer to turn on to full brightness or custom brightness level aer you double-tap the upper paddle.Size: 1 byte
Default: 0
Minimum: 0
Maximum: 1
Possible values
| From | To | Desription |
|---|---|---|
| 0 | 0 | the light will turn on to full brightness with double tap (default). |
| 1 | 1 | the light will turn on to the maximum brightness level set in Parameter 15 with double tap. |
18 - Double Tap Function for Dimmer: Disable/Enable
Enable or disable the double-tap function and assign brightness level to single tap.Size: 1 byte
Default: 0
Minimum: 0
Maximum: 2
Possible values
| From | To | Desription |
|---|---|---|
| 0 | 0 | double tap to full / maximum brightness level enabled (default). |
| 1 | 1 | double tap to full / maximum brightness level disabled, single tap turns light on to last brightness level (or custom value set in Parameter 23) |
| 2 | 2 | double tap to full / maximum brightness level disabled, single tap turns light on to full brightness level. |
19 - Enable/Disable Load Control for Dimmer (Smart Bulb Setting)
Enable or disable direct manual and Z-Wave control of the connected light. Works great for smart bulb control. If disabled, the dimmer will no longer control the connected bulb directly but will still send on/off and brightness reports to the hub so you can use them to create automations for your smart bulbs or other switches. Scenes and other functionality will still be available through paddles.Size: 1 byte
Default: 1
Minimum: 0
Maximum: 2
Possible values
| From | To | Desription |
|---|---|---|
| 0 | 0 | manual control disabled. |
| 1 | 1 | manual control enabled |
| 2 | 2 | manual and Z-Wave control disabled. |
20 - Enable/Disable Load Control for Relay (Remote Control Setting)
Enable or disable direct manual and Z-Wave control of the connected load. Works great for smart bulbs or any type of remote / scene control. If disabled, the relay will no longer control the connected load directly but will still send on/off reports to the hub so you can use them to create automations for your smart bulbs or other devices. Scenes and other functionality will still be available through the button.Size: 1 byte
Default: 1
Minimum: 0
Maximum: 2
Possible values
| From | To | Desription |
|---|---|---|
| 0 | 0 | manual control disabled. |
| 1 | 1 | manual control enabled |
| 2 | 2 | manual and Z-Wave control disabled. |
21 - Manual Dimming Speed
Choose how many seconds it takes for the dimmer to go from 0% to 100% brightness when pressing and holding the paddle. Increase the value to decrease the dimming speed.Size: 1 byte
Default: 4
Minimum: 1
Maximum: 99
Possible values
| From | To | Desription |
|---|---|---|
| 1 | 99 | seconds |
22 - Z-Wave Ramp Rate for Dimmer
Choose if you would like to match the Z-Wave on/off ramp rate with the manual ramp rate or set it separately in your hub.Size: 1 byte
Default: 0
Minimum: 0
Maximum: 1
Possible values
| From | To | Desription |
|---|---|---|
| 0 | 0 | Z-Wave on/off ramp rate matches the manual ramp rate set in Parameter 13. |
| 1 | 1 | Z-Wave on/off ramp rate is set separately through its command class in the hub. |
23 - Custom Brightness Level On for Dimmer
Set custom brightness level (in %) for the dimmer to come on to at single tap.Size: 1 byte
Default: 0
Minimum: 0
Maximum: 99
Possible values
| From | To | Desription |
|---|---|---|
| 0 | 0 | last brightness level |
| 1 | 99 | % brightness |
1. Initiate inclusion (pairing) in the app (or web interface). 2. Finalize inclusion at the switch. Tap the upper paddle of the dimmer 3 times quickly. The LED indicators will blink to signal communication and remain on for 2 seconds to confirm inclusion.
Bring your Z-Wave gateway (hub) close to the switch if possible 2. Put the Z-Wave hub into exclusion mode 3. Tap the lower paddle on the dimmer 3 times quickly 4. Your hub will confirm exclusion and the device will disappear from your controller's device list
If your primary controller is missing or inoperable, you may need to reset the device to factory settings. To complete the reset process manually, press and hold the lower paddle on the dimmer for at least 15 seconds until the LED indicators start flashing, release. Then immediately press and hold the upper paddle on the dimmer for at least 15 seconds. The LED indicators will flash again to confirm successful reset.
| Type | Value(s) |
|---|