Philio
In Wall Micro Dimmer
PAD19-KR
Multilevel Switch DT
HW: 01 FW: 01.03:01.02
ZGM130S037HGN2 / ZGM130S037HGN1
7.16.3
0x013C (316)
N/A
0x0005 (5)
ZC14-22040093
2022-04-01 11:23:00
N/A
Enhanced 232 Slave
Always On Slave
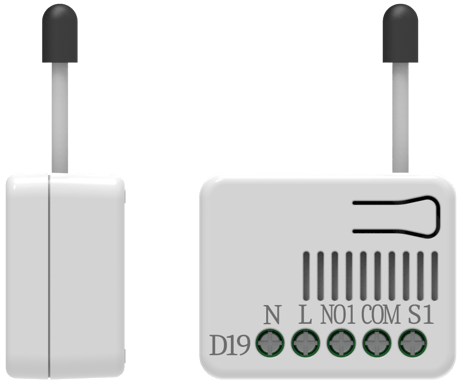
PAD19 is a 2/3 Wire dimmer. It can only needs to connect two wires, single wire (L) and load (NO1),or three wires, two wire (L、N) and load (NO1)


1 - Power-on recovery status set
To set dimmer level when AC power on.Size: 1 byte
Default: 0
Minimum: 0
Maximum: 2
Possible values
| From | To | Desription |
|---|---|---|
| 0 | 0 | OFF-0% |
| 1 | 1 | ON-last level |
| 2 | 2 | ON-100% |
2 - RF report set
To set if device send Multilevel Switch report to gateway when dimming finished.Size: 1 byte
Default: 1
Minimum: 0
Maximum: 1
Possible values
| From | To | Desription |
|---|---|---|
| 1 | 1 | report ON |
| 0 | 0 | report OFF |
3 - Maximum level
To set dimming level maximum value. Dimming level will not over the setting value.Size: 1 byte
Default: 99
Minimum: 1
Maximum: 99
Possible values
| From | To | Desription |
|---|---|---|
| 1 | 99 | percent |
4 - Minimum level
To set dimming level minimum value. Dimming level will directly go to 0% when dimming value is lower than the setting value.Size: 1 byte
Default: 0
Minimum: 0
Maximum: 98
Possible values
| From | To | Desription |
|---|---|---|
| 0 | 98 | percent |
5 - Basic duration set
To set dimming finished duration time when physical switch used.Size: 1 byte
Default: 2
Minimum: 0
Maximum: 127
Possible values
| From | To | Desription |
|---|---|---|
| 0 | 127 | time |
1. Put your Z-Wave™ controller into inclusion mode by following the instructions provided by the controller manufacturer. 2. Press the include button three times within 3 seconds to enter inclusion mode.
1. Put your Z-Wave™ controller into exclusion mode by following the instructions provided by the controller manufacturer. 2. Press the include button three times within 3 seconds to enter exclusion mode. 3. Node ID will be excluded.
1. Press the include button four times within 3 seconds and hold on the button press without releasing. 2. Keep pressing the button for 3 seconds then LED will be off, release the button within 2 seconds. 3. Device has been reset.
1. The product has a DSK string. Key in the first five digits to initiate the SmartStart process, or scan QR code. 2. SmartStart enabled products can be added into a Z-Wave™ network by scanning the Z-Wave™ QR Code on the product, with a controller providing SmartStart inclusion.No further action is required and the SmartStart product will be added automatically to the closest network within 10 minutes of being switched on.
| Type | Value(s) |
|---|
| Group | Type |
|---|---|
| Power Management | Over-load status: Over-load detected |