Shelly Qubino
Wave 1
QNSW-001X16EU
Binary Switch DT
HW: 01 FW: 11.01:02.02
EFR32ZG23A
7.19.1
0x0460 (1120)
N/A
0x0002 (2)
ZC14-23090326
2023-09-04 15:08:59
N/A
Enhanced End Node 232
Always On End Node
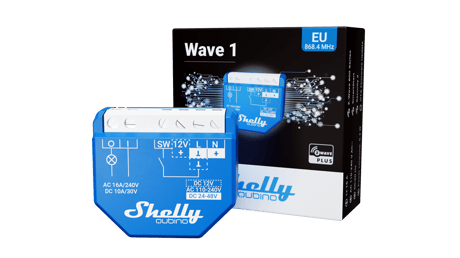
Wave 1 controls the on/off function for one electrical device, e.g., bulb, ceiling fan, IR heater, electrical locks, garage doors, irrigation system, etc. The output contact is potential-free (dry contact).


1 - SW1 Switch type
This parameter defines how the Device should treat the switch (which type) connected to the SW (SW1) terminal.Size: 1 byte
Default: 2
Minimum: 0
Maximum: 2
Possible values
| From | To | Desription |
|---|---|---|
| 0 | 0 | momentary switch |
| 1 | 1 | toggle switch (contact closed - ON / contact opened - OFF) |
| 2 | 2 | toggle switch (Device changes status when switch changes status) |
17 - Restore state of O1 after power failure
This parameter determines if the on/off status is saved and restored for the load connected to O (01) after a power failure.Size: 1 byte
Default: 0
Minimum: 0
Maximum: 1
Possible values
| From | To | Desription |
|---|---|---|
| 0 | 0 | Device saves last on/off status and restores it after a power failure |
| 1 | 1 | Device does not save on/off status and does not restore it after a power failure, it remains off |
19 - Turn O1 OFF Automatically with timer
If the load O (01) is ON, you can schedule it to turn OFF automatically after the period of time defined in this parameter. The timer resets to zero each time the Device receives an ON command, either remotely (from the gateway or associated device) or locally from the switch.Size: 2 bytes
Default: 0
Minimum: 0
Maximum: 32535
Possible values
| From | To | Desription |
|---|---|---|
| 0 | 0 | Auto OFF Disabled |
| 1 | 32535 | 1 - 32535 seconds (or milliseconds – see Parameter no. 25. Auto OFF timer enabled for a given amount of seconds (or milliseconds) resolution 100ms |
20 - Turn O1 ON Automatically with timer
If the load O (01) is OFF, you can schedule it to turn ON automatically after the period of time defined in this parameter. The timer resets to zero each time the Device receives an OFF command, either remotely (from the gateway or associated device) or locally from the switch.Size: 2 bytes
Default: 0
Minimum: 0
Maximum: 32535
Possible values
| From | To | Desription |
|---|---|---|
| 0 | 0 | Auto ON Disabled |
| 1 | 32535 | 1-32535 = 1 - 32535 seconds (or milliseconds – see Parameter No. 25. Auto ON timer enabled for a given amount of seconds (or milliseconds) resolution 100ms |
23 - O1 contact type - NO/NC
The set value determines the relay contact type for output O (01) . The relay contact type can be normally open (NO) or normally closed (NC).Size: 1 byte
Default: 0
Minimum: 0
Maximum: 1
Possible values
| From | To | Desription |
|---|---|---|
| 0 | 0 | NO |
| 1 | 1 | NC |
25 - Set timer units to Seconds or Milliseconds for O1
Set the timer units to seconds or milliseconds. Choose if you want to set the timer in seconds or milliseconds in Parameters No. 19, 20.Size: 1 byte
Default: 0
Minimum: 0
Maximum: 1
Possible values
| From | To | Desription |
|---|---|---|
| 0 | 0 | timer set in seconds |
| 1 | 1 | timer set in milliseconds |
91 - Water Alarm
This parameter determines which alarm frames the Device should respond to and how. The parameters consist of 4 bytes, the three most significant bytes are set according to the official Z-Wave protocol specification.Size: 4 bytes
Default: 0
Minimum: 0
Maximum: 2
Possible values
| From | To | Desription |
|---|---|---|
| 0 | 0 | no action |
| 1 | 1 | open relay |
| 2 | 2 | close relay |
92 - Smoke Alarm
This parameter determines which alarm frames the Device should respond to and how. The parameters consist of 4 bytes, the three most significant bytes are set according to the official Z-Wave protocol specification.Size: 4 bytes
Default: 0
Minimum: 0
Maximum: 2
Possible values
| From | To | Desription |
|---|---|---|
| 0 | 0 | no action |
| 1 | 1 | open relay |
| 2 | 2 | close relay |
93 - CO Alarm
This parameter determines which alarm frames the Device should respond to and how. The parameters consist of 4 bytes, the three most significant bytes are set according to the official Z-Wave protocol specification.Size: 4 bytes
Default: 0
Minimum: 0
Maximum: 2
Possible values
| From | To | Desription |
|---|---|---|
| 0 | 0 | no action |
| 1 | 1 | open relay |
| 2 | 2 | close relay |
94 - Heat Alarm
This parameter determines which alarm frames the Device should respond to and how. The parameters consist of 4 bytes, the three most significant bytes are set according to the official Z-Wave protocol specification.Size: 4 bytes
Default: 0
Minimum: 0
Maximum: 2
Possible values
| From | To | Desription |
|---|---|---|
| 0 | 0 | no action |
| 1 | 1 | open relay |
| 2 | 2 | close relay |
120 - Factory Reset
Reset to factory default settings and removed from the Z-Wave network.Size: 1 byte
Default: 0
Minimum: 0
Maximum: 1
Possible values
| From | To | Desription |
|---|---|---|
| 0 | 0 | Don't do Factory reset |
| 1 | 1 | Do the Factory reset |
201 - Serial Number 1
This parameter contains a part of device's serial number.Size: 4 bytes
Default: 0
Minimum: 0
Maximum: 2147483647
Possible values
| From | To | Desription |
|---|---|---|
| 0 | 0 | 0 |
202 - Serial Number 2
This parameter contains a part of device's serial number.Size: 4 bytes
Default: 0
Minimum: 0
Maximum: 2147483647
Possible values
| From | To | Desription |
|---|---|---|
| 0 | 0 | 0 |
203 - Serial Number 3
This parameter contains a part of device's serial number.Size: 4 bytes
Default: 0
Minimum: 0
Maximum: 2147483647
Possible values
| From | To | Desription |
|---|---|---|
| 0 | 0 | 0 |
6.1 Adding the Device to a Z-Wave™ network (inclusion) Note! All Device outputs (O, O1, O2, etc. - depending on the Device type) will turn the load 1s on/1s off /1s on/1s off if the Device is successfully added to/removed from a Z-Wave™ network. 6.1.1 SmartStart adding (inclusion) SmartStart enabled products can be added into a Z-Wave™ network by scanning the Z-Wave™ QR Code present on the Device with a gateway providing SmartStart inclusion. No further action is required, and the SmartStart device will be added automatically within 10 minutes of being switched on in the network vicinity. 1. With the gateway application scan the QR code on the Device label and add the Security 2 (S2) Device Specific Key (DSK) to the provisioning list in the gateway. 2. Connect the Device to a power supply. 3. Check if the blue LED is blinking in Mode 1. If so, the Device is not added to a Z-Wave™ network. 4. Adding will be initiated automatically within a few seconds after connecting the Device to a power supply, and the Device will be added to a Z-Wave™ network automatically. 5. The blue LED will be blinking in Mode 2 during the adding process. 6. The green LED will be blinking in Mode 1 if the Device is successfully added to a Z-Wave™ network. 6.1.2 Adding (inclusion) with a switch/push-button 1. Connect the Device to a power supply. 2. Check if the blue LED is blinking in Mode 1. If so, the Device is not added to a Z-Wave™ network. 3. Enable add/remove mode on the gateway. 4. Toggle the switch/push-button connected to any of the SW terminals (SW, SW1, SW2, etc.) 3 times within 3 seconds (this procedure puts the Device in Learn mode*). The Device must receive on/off signal 3 times, which means pressing the momentary switch 3 times, or toggling the switch on and off 3 times. 5. The blue LED will be blinking in Mode 2 during the adding process. 6. The green LED will be blinking in Mode 1 if the Device is successfully added to a Z-Wave™ network. *Learn mode - a state that allows the Device to receive network information from the gateway. 6.1.3 Adding (inclusion) with the S button 1. Connect the Device to a power supply. 2. Check if the blue LED is blinking in Mode 1. If so, the Device is not added to a Z-Wave™ network. 3. Enable add/remove mode on the gateway. 4. To enter the Setting mode, quickly press and hold the S button on the Device until the LED turns solid blue. 5. Quickly release and then press and hold (> 2s) the S button on the Device until the blue LED starts blinking in Mode 3. Releasing the S button will start the Learn mode. 6. The blue LED will be blinking in Mode 2 during the adding process. 7. The green LED will be blinking in Mode 1 if the Device is successfully added to a Z-Wave™ network. Note! In Setting mode, the Device has a timeout of 10s before entering again into Normal mode.
Removing the Device from a Z-Wave™ network (exclusion) Note! The Device will be removed from your Z-wave™ network, but any custom configuration parameters will not be erased. Note! All Device outputs (O, O1, O2, etc. - depending on the Device type) will turn the load 1s on/1s off /1s on/1s off if the Device is successfully added to/removed from a Z-Wave™ network. 6.2.1 Removing (exclusion) with a switch/push-button 1. Connect the Device to a power supply. 2. Check if the green LED is blinking in Mode 1. If so, the Device is added to a Z-Wave™ network. 3. Enable add/remove mode on the gateway. 4. Toggle the switch/push-button connected to any of the SW terminals (SW, SW1, SW2,…) 3 times within 3 seconds (this procedure puts the Device in Learn mode). The Device must receive on/off signal 3 times, which means pressing the momentary switch 3 times, or toggling the switch on and off 3 times. 5. The blue LED will be blinking in Mode 2 during the removing process. 6. The blue LED will be blinking in Mode 1 if the Device is successfully removed from a Z-Wave™ network. 6.2.2 Removing (exclusion) with the S button 1. Connect the Device to a power supply. 2. Check if the green LED is blinking in Mode 1. If so, the Device is added to a Z-Wave™ network. 3. Enable add/remove mode on the gateway. 4. To enter the Setting mode, quickly press and hold the S button on the Device until the LED turns solid blue. 5. Quickly release and then press and hold (> 2s) the S button on the Device until the blue LED starts blinking in Mode 3. Releasing the S button will start the Learn mode. 6. The blue LED will be blinking in Mode 2 during the removing process. 7. The blue LED will be blinking in Mode 1 if the Device is successfully removed from a Z-Wave™ network. Note! In Setting mode, the Device has a timeout of 10s before entering again into Normal mode.
6.3 Factory reset 6.3.1 Factory reset general After Factory reset, all custom parameters and stored values (kWh, associations, routings, etc.) will return to their default state. HOME ID and NODE ID assigned to the Device will be deleted. Use this reset procedure only when the gateway is missing or otherwise inoperable. 6.3.2 Factory reset with a switch/push-button Note! Factory reset with a switch/push-button is only possible within the first minute after the Device is connected to a power supply. 1. Connect the Device to a power supply. 2. Toggle the switch/push-button connected to any of the SW terminals (SW, SW1, SW2,…) 5 times within 3 seconds. The Device must receive on/off signal 5 times, which means pressing the push-button 5 times, or toggling the switch on and off 5 times. 3. During factory reset, the LED will turn solid green for about 1s, then the blue and red LED will start blinking in Mode 3 for approx. 2s. 4. The blue LED will be blinking in Mode 1 if the Factory reset is successful. 6.3.3 Factory reset with the S button Note! Factory reset with the S button is possible anytime. 1. To enter the Setting mode, quickly press and hold the S button on the Device until the LED turns solid blue. 2. Press the S button multiple times until the LED turns solid red. 3. Press and hold (> 2s) S button on the Device until the red LED starts blinking in Mode 3. Releasing the S button will start the factory reset. 4. During factory reset, the LED will turn solid green for about 1s, then the blue and red LED will start blinking in Mode 3 for approx. 2s. 5. The blue LED will be blinking in Mode 1 if the Factory reset is successful. 6.3.4 Remote factory reset with parameter with the gateway Factory reset can be done remotely with the settings in Parameter No. 120.
When adding the Device to a Z-Wave network with a gateway supporting Security 2 (S2), the PIN Code of the Z-Wave Device Specific Key (DSK) is required. You can find it on the label on the side of the Device and a copy is inserted in the packaging, which must not be lost. Do not remove the Z-Wave DSK label from the Device. As a backup measure, use the label in the packaging. The first five digits of the key are highlighted or underlined to help the user identify the PIN Code part of the DSK text. The DSK is additionally represented with a QR Code as shown on the image.
| Type | Value(s) |
|---|
| Group | Type |
|---|---|
| Heat Alarm | Heat sensor status: Overheat detected |